
(26/11/05)
Got up early and spend a few hours clearing all the bits away so I know where they are when I want them, nothing worse than tripping over bits and hunting for hours saying "I thought that was in this box"!! Managed to get the car up onto the stands and hung the bodywork from the joists with the help of Kev (Flat Eric), jezz I wish I had a taller garage, I've only banged my head 3 times today, I can see me ending up with either a face like Quasimodo, or a hunch from ducking - OR Both!
I can see the chassis moving as I do work on it so I've tie-wrapped it to the build stands just for piece of mind.
Got all the alloy panels out ready to start fitting and found out I've been given the wrong ones. Bad start but it won't stop me yet, I asked for the top scuttle panel to be left uncut as I want to fit the fuse box under the dash, also the footrest is missing and I have full floor panels instead of half ones. First call to Westfield's and I'm sure it won't be the last.
I checked over the chassis and removed all the bolts that are fitted whilst it was being powder-coated, chucked these as they are cheap bolts and not worth keeping. Took a couple of pics as shown below. (1) Note the wide tunnel , this is now standard MT75 gearbox size so my "Type 9" gearbox should fit in there sideways! (2) They also fitted the metalastic bushes in the Diff carrier and (3) the Rivnuts into the front of the chassis for fitting the nosecone, that's nice of them. (4) This shows the pedal brackets before I bodge the pedals onto them later on.
(1) (2)
(2) (3)
(3)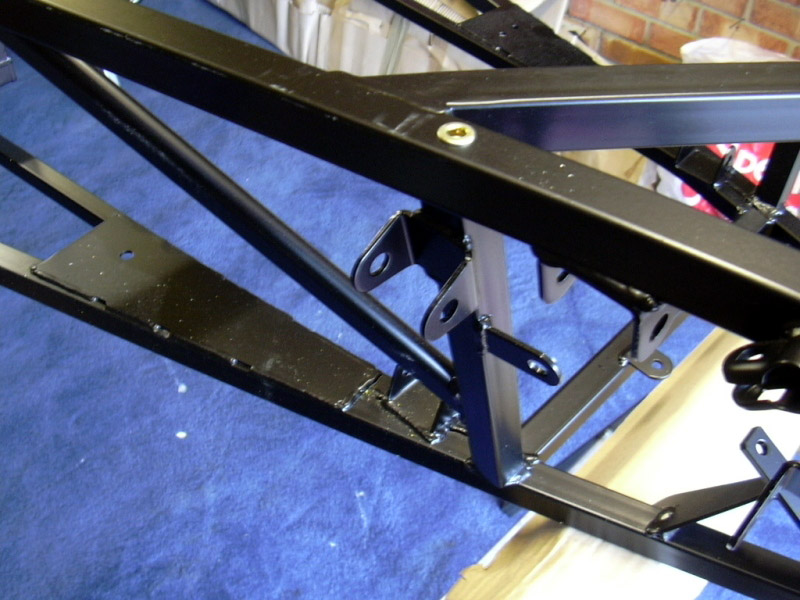 (4)
(4)
After having about 3 cups of coffee and 10 cigs, I plucked up enough courage to drill some holes. First panel to go on was not the tunnel sides as the manual says but the front foot well. This is because I'd like to fit the brake pipes up the tunnel so I needed to know exactly where it fits so I could measure it, also, leaving the tunnel panels off gives me more access to drill to fit the pipes (inc fuel pipe).
Clamped down the panel, loosely fitted the brake reservoir so it lined up ok, and drilled the holes, nice neat job I thought.
 Some of them were very awkward to get to but having a sharp drill makes things
easier, get plenty of drills, you will need them. Westfield Stores kindly supplied me with extra Black rivets, these look much nicer on the black panels. Also found some black, yes "Black" silicon, this will make it look much neater too as you won't see the joins around the chassis tubes.
Some of them were very awkward to get to but having a sharp drill makes things
easier, get plenty of drills, you will need them. Westfield Stores kindly supplied me with extra Black rivets, these look much nicer on the black panels. Also found some black, yes "Black" silicon, this will make it look much neater too as you won't see the joins around the chassis tubes.
Tried to fit the pedals next just to see what they looked like but the M8x55mm bolts aren't in the kit, another call to Westfield's on Monday. Well a very exciting first day, at this rate, I should finish in 2008.
(27/11/05)
Another cold day in the Garage today, didn't have too much time in the garage as it was the Westfield local meeting today so just before I went, I did a bit on the Brakes, nothing like a bit of variety.
 After the meeting, I ventured out again and fitted the other foot well panel. Just about drilled all the holes and snapped my first drill, so that's 1 drill for 36 holes - I'd better buy a drill company at this rate. Managed to get myself covered in more silicon, 2 panels down, 12 to go.
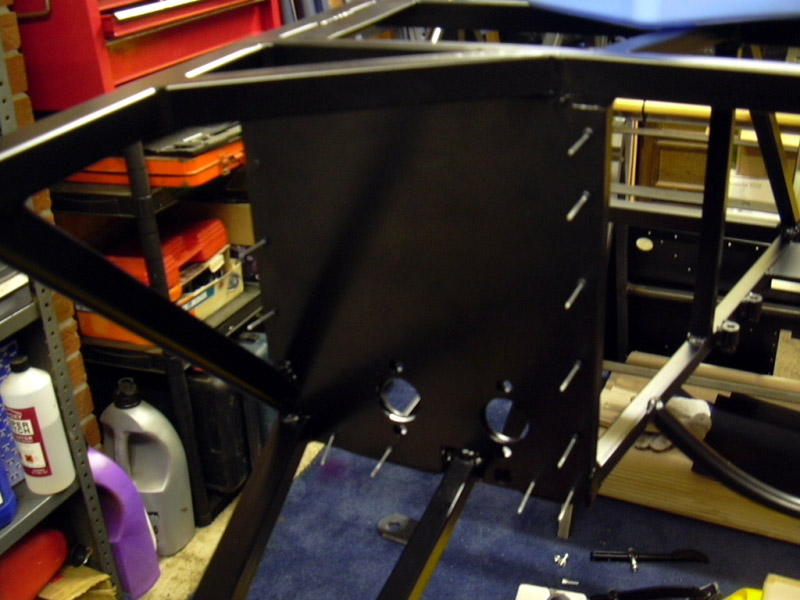
 After doing a couple of the brake pipes etc, I test fitted the tunnel side panels, these are supposed to be the first panels fitted but what Westfield's didn't tell me is the lowered floor has to go in first as the side panels overlap them I think? Will have to check (see pic). The floor panels are sided as the drivers side is slightly wider than the passenger side. The two holes drilled at one end go towards the back because they are also slightly tapered.
I didn't have chance to fit the floor today as it looks like I'll have to fit them at exactly the same time as the tunnel sides so that will have to wait for another day.
(28/11/05)
After doing a bit of brake pipework, I had to give my thumb a rest so I tackled the Tunnel sides and floorpan on the passenger side. I had to call Mark Walker regarding this as the tunnel side overlaps the lowered floor (as you should know if your paying attention), or was it the other way around. This was obviously not in the build manual so a quick call answered my question .... "either way" - Hmmmm.I decided to put the tunnel side over the floor as it's harder to spot the join, especially in black. It looks like I'll have to fit both panels at the same time because of the overlapping bit.
Clamped the panels down and drilled what seemed 200 holes, dropped my drill and bent it - damn and blast, that's another £2.65 down the drain. Got another spare so don't worry readers - lol.


 A couple of pictures showing the progress with the panels, didn't have time to silicone them today as Dinner was ready and I don't want to rush it. Got a messy
day ahead of me tomorrow.
A couple of pictures showing the progress with the panels, didn't have time to silicone them today as Dinner was ready and I don't want to rush it. Got a messy
day ahead of me tomorrow.
(29/11/05)
Decided to finish off the passenger paneling today even though I wasn't looking forward to it, it had to be done. I've also realised that I can still fit the fuel pipes/brake pipes even with the panels fixed so let's get on with it. Before I fitted them, I had to cut out a section so the front of the panel could fold over the front of the chassis frame just where the passenger's feet go. This was then folded over, unfortunately, it resulted in cracking the powder-coating which was a bit gutting, this will be sprayed over later.
 This shows the panel folded, note the mess it's made of my coating - boo hoo! Drilled the holes and cleaned out all the swarf etc from the holes and silicone'd it. Did I mention that I managed to get Black silicone ... oh yeah I did!
 Silicone'd all around both side and floor and proceeded to rivet, how many rivets? just wait until you see the outer panels. This is just to give you a taste of what it will look like in case you wanted to do them manually - I did!
 One bit done, I then taped some cardboard to the floor as it's bound to get damaged. It also serves as a handy tray for all my tools etc etc.
Wasn't able to rivet the rear of the floorpan because this will be overlapped by the back panel at a later date.
 Postman has just been with my new front floor panels that Westfield forgot to give me, ooooh some nice new bits, had to put them on so drill out, rivets at the ready - Done!
Note that some people spin their chassis's over to do the floor, if you have decent build stands, then you can just crawl underneath and drill upwards.

 What do you think of that lot, 87 rivets in all, I know I counted them. It looks like a porcupine but 30 mins later, it looked better. I used normal alloy rivets on the outside, I didn't want to waste my nice black ones where you won't see them.
Didn't have much strength left after that lot so I just messed about with the back suspension sussing out where it all goes.
(30/11/05)
Nothing exciting today, just a bit more paneling, absolutely knackered after yesterday but hey, onward and upward. BTW, this is what the floor supports look like, the floor just sits nicely on top of them not like the normal floor which rivets below the struts.
 Nothing much to say here other than, I covered the floor with cardboard BEFORE I fixed it this time, much better as there's no fear of the drill or anything else damaging it.


 Fitted both foot well panels with my last ounce of strength. Don't fit one at a time because you will need access to drill the opposite side and if you rivet one in, it makes life very difficult. Note the nice little footrest built in on drivers side. I also used large headed rivets on the fiberglass footrest just to spread the load. This may be overkill but I had some spare so what the hell.
I had to leave the panels for now, so went on to some
Suspension work.
(1/12/05)
 Got all my bolts for the pedals fitted today, M8x55mm for the Clutch, M8x70mm bar (threaded both ends) for the Brake and a M8x50mm for the Gas pedal. The brake master cylinder is fitted with 2 M8x35mm bolts which Westfield's kindly supplied.
You guessed it, more panels. Fitted the drivers side front floor but had to fettle a bit out to go around the weld on the gearbox hoop (as I did for the other side). This was a straight fit otherwise.
Plucked up enough courage to have a go at the drivers outer side panel too, another 87 rivets later that was done and dusted. The awkward one is still looming, the back panel but that's for another day.
It went really quickly today, I must be getting used to riveting now, just don't
shake hands with me for the next few weeks coz I'll crush your hands - lol.
(2/12/05)
 Finally got around to fitting the back panel today, it was a nightmare to get in as it had to be curved in both sides to fit between the chassis rails. Managed to scratch the powder-coating but hey, it's not the end of the world.
Passenger side lower edges had to be cut down a bit to fit as they were too tight, this was done in situ, I didn't fancy scratching it any more.
Drilled it, de-burred it and siliconed it again in situ, very messy and difficult but I got there. The rest of the day was spent on Suspension & Steering bits.
(3/12/05)
 Made up some Fuel tank straps, it wasn't worth buying them as they're so simple to make. Just some thin alloy sheet 2" x 20.5" (Approx). Cut them out, clamped down one end and bent over the tank. Need to borrow a Rivnut tool as I didn't ask for them to be put in by the factory although they did fit the ones for the nosecone!!
 Running out of things to do now, looks like I'll need to rob somebody to get some more bits before I can make any real progress beyond this point. I found out that I had a clutch cable which was a pleasant surprise, this is part of the starter kit. Needed to file out the hole first as the foot well panel overlapped a bit, then connected it up and found the split pin wouldn't go through the hole in the pivot pin in the clutch fork. Managed to find an "R" clip which worked a treat. I also fitted the handbrake cable, need a handbrake which I may go looking for tomorrow down the breakers.
(19/02/06)


 Some pictures of the rolling chassis just before I Fitted the bodywork. Do you think I should leave the stickers on the tyres? I think they look quite nice - lol
 (16/03/06)
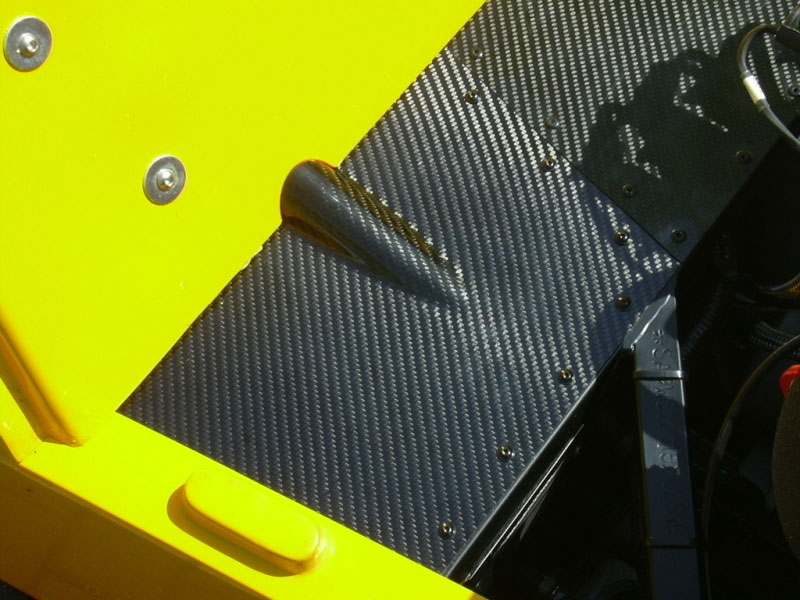
I've Finally plucked up enough courage to cut my Carbon Fibre scuttle panel to size and fit it, well nobody else was going to do it for me .... oh the joys of DIY!
 I decided on Carbon to match the engine theme and the I've found the powder coated panels were scratching too easily. A bit expensive but hey it looks nice.
First I had to mark out where to cut around the pedal inspection cover after covering it entirely with masking tape. I cut the inspection hole out and used the old panel to mark the rivet fixing points. This was then sealed and riveted down quick as you like.
If you ever have to cut Carbon, use a very fine jigsaw blade and use a mask as the dust is quite harmful apparently.
I had to use ordinary rivets at the back of the panel as I had run out of black ones (I found out last minute - doh) but these won't be seen. Just doing this panel completely blunted a new jigsaw blade!
(28/04/06)
The cycle wing stays needed to be fitted before I could do the wings so a free hour on Friday saw me doing these. Relitevely easy job, just needed to make sure they didn't touch the tyres and still covered the195/50/15 tyres fitted.
With the bottom bolt fitted, I just needed to pack out the top two fixing bolts with some washers.
Once this was done, you have to level the wing supporting arms so they are level with the top of the tyre, this will give a nice square look which may involve some bending.
(13/05/06)
I suppose the pedal box cover could be counted as part of the chassis so here it is.Not wanting an overlap, I decided to butt it up against the scuttle top cover and put an "L" shaped bracket onto the chassis to support the underside of it.

 I also didn't like the vertical lip that goes around the steering column that you get on a normal pedal box cover so I cut this off and shaped the scuttle around the lump (very technical don't you think?). This give much smoother lines to the area. First pic shows it without the scuttle on, 2nd & 3rd show the overall view. As a note, the outer edge of this panel slips under the return edge of the bodywork so no need to fix it down. Finished it off with some caphead screws which were sprayed black to match the rivets.
Now whilst I was in the area, I noticed there was a hole in the front of the drivers foot well! This is obviously for twin master cylinders which
I didn't have so something had to be done about it.
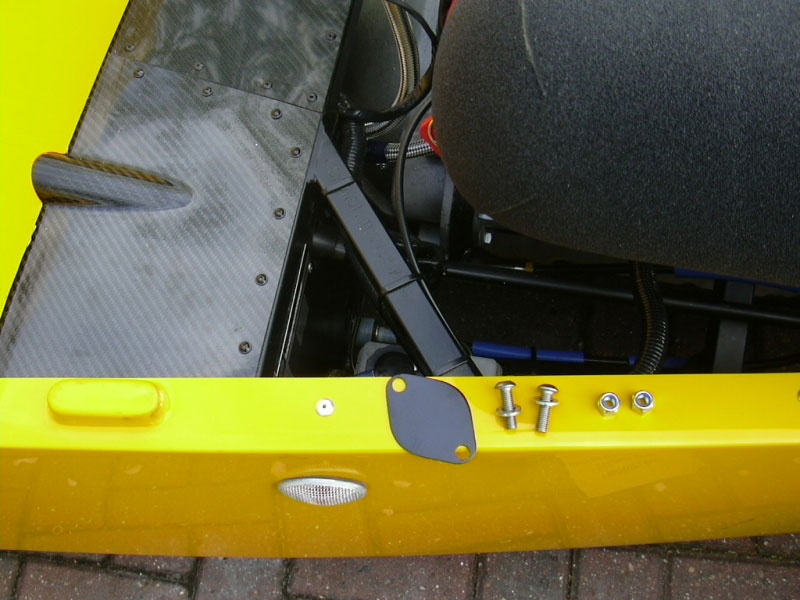
 I Made up a simple plate out of 2mm alloy, sprayed it black and bolted up through the supplied holes, if only everything was this simple. Pic 2 shows where it goes.
Also had the chance to fit my chassis Vin plate, it's a bit difficult to read but how often do you look at it let's be fair?